Thursday, December 3, 2015
THE 80/20 RULE: A FEW ANGLES
The 80/20 rule says that 80 percent of your business probably comes from 20% of your customers, give or take. Upon analysis, many find that 80% of their sales and marketing results come from maybe 20% of the actions they take.
No matter what your profession or business, it is always valuable to “take a step back” to see what is getting the most results. In the absence of doing this, one can inadvertently spend time, staff resources and energy pursuing “low yield” activities.
In our printing business, we try to regularly take that step back to assess what is working and what is not, both in terms of sales and marketing and operations.
Have you ever looked to see what actions led to your biggest clients, projects, and sales? Here are some ways to review and analyze this:
Did a particular type of promotion cause the results?
Were referrals from other customers responsible?
Did one or more particular employees deliver exceptional service that caused clients to trust you more and open up new opportunities?
Some other new way your business became visible? New signage? Updated website?
If you can’t get the answer from your analysis, you can also survey those customers and ask them.
One way or another, if you find out what caused an improvement, you are in the best position to expand on that, reinforce it, and continue it.
Can you identify any other questions you can ask or ways you can analyze your business to identify sources of success? Write back with any experience you have with ways of doing this type of analysis and your successes in this area.
HELPING OUT
One of our clients is a large organization that held a special night for its staff recently. The client requested contributions from its vendors to help provide prizes for drawings during the night.
I donated a few prizes from our printing company. My contact was very appreciative of what we did.
Much to my surprise, she offered to help make our business more well known in her particular part of the organization. I was not really expecting that, as I wanted to give something to this group as an acknowledgment, since they trust us with a lot of their printing.
However, it did remind me again, as I have been reminded many times before, that when you give, you often get something in return, even if you don’t expect it.
Besides, helping is most often gratifying for the one who helps as well as benefiting those who are assisted.
FOLLOWING UP WITH YOUR CLIENTS
In the high pace of business, when we receive a service or product from a vendor and everything is “as expected”, we tend to move on to the next project or deadline.
If there is some kind of problem with the product or service, we may contact that vendor. Thus, the vendor or service provider may “hear about it”. (As the vendor, you hope the client contacts you, as you then have the chance to fix the issue!)
While product and service deficiencies are hopefully very infrequent in your business, being able to address them when they happen is critical. You otherwise run the risk of losing a client.
How often do you receive a personal follow up call or email from a service provider, to check on your level of satisfaction? Chances are, not very often. I know that if I receive such a communication, infrequent as it is, I consider it a point of exceptional service and care.
Having a follow up plan and program in place is a great way to differentiate your company. It accomplishes:
•Catching problems that may otherwise go unaddressed and leave the client with a lowered trust factor
•More often, it simply gives you a chance to thank the client for trusting you
How often you reach out like this to regular/repeat customers is a matter of judgment. You don’t want to “bug” them with too many calls, but you don’t want to take them for granted either. Consider putting a follow up program in place in your business. It can be a great tool for customer retention.
Paper Stocks
Deluxe Superthick Business Cards
If you really want to stand out with a card they’ll want to keep, have a look at our Superthick business cards. We laminate multiple layers of paper and other materials to produce cards that impress everyone who sees them. These cards will convey your message with style they won’t soon forget. Options include full-color [...]
Prints and Copies
The best quality prints in black & white or full color on the latest digital equipment, from any file or hard copy. Friendly service, fast turnarounds and great prices. Just let us know what you need and we’ll get right on it. We offer great discounts on larger orders, so please ask us for a custom [...]
Postcards and Flyers
Hand out something they’ll notice and remember. High-quality postcards, flyers and brochures get you noticed. Aqueous Matte or Hi-gloss UV finish on a variety of FSC Certified paper stocks. Printed on one side or both, it’s up to you. Our 14pt Express Digital products can be ready on very quick turnarounds, even same day. Offset [...]
File set up tips for books and booklets
 Creating a book can be a little more complicated than other projects. We see a lot of the same set-up mistakes on many book printing jobs, so here are some helpful tips to review when you’re preparing your materials:
USE ADOBE ACROBAT
We strongly recommend submitting your files as PDF’s. If you can prepare a print-ready PDF with the right specs not only will you save a lot of time and cost, you will have a lot more control over the final result. Variables like margins, bleeds, spreads, pageflow and other common challenges can all be addressed ahead of submitting your files for printing, so we can get the results you are looking for the very first time.
You can make PDF’s from just about any software you might be using. We are happy to answer questions about how to do this, and if you need more guidance we can set up a personal consultation to help you get on the right track.
WORKING WITH BLEEDS
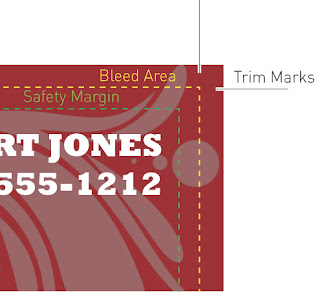
 Be sure to understand how bleeds work. This is essential for professional results. We’ll need 1/8″ of extra background for trimming and content must be at least 1/8″ in from the edge. The gutter or spine of the book needs to be considered as well, since each binding method has it’s own requirements for margins.
BOOK LAYOUT

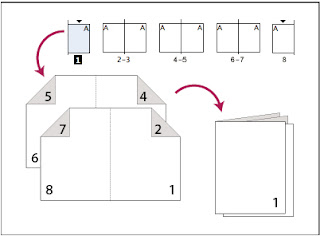
Know how your book is actually going to be put together. Some production methods will require printer spreads and some will work with flat sheets. If you are making a saddle-stitched booklet or magazine, you will need pages in multiples of 4.
ADOBE INDESIGN
InDesign is the tool of choice for creating files to print a book. It’s worth learning to use if you want the ultimate creative and technical control over your project. You can download a free trial at Adobe’s website.
To avoid any confusion between reader spreads and printer spreads, please provide SINGLE PAGES with full bleeds, not reader spreads. This way we have the margins needed to properly order the pages into printer spreads. To learn more about page imposition click here.
ADOBE PHOTOSHOP
If you’re making a portfolio, zine, or graphic novel and content is already in a group of Photoshop Images, it may be easiest just to work with those. Organize them by naming the files with their respective page numbers so that they automatically stay in order through the prep and printing.
Make sure the images are at least 300dpi. We make beautiful prints but we can’t print what isn’t there. Also avoid using compression for the best results with digital printing. PSD’s, TIFF’s, and JPEG’s are all fine to work with but be sure to save them at maximum quality. Even hi-res photos print poorly from a low quality JPEG. You can also save them as PDF’s right from Photoshop and combine them into one file which has a lot of advantages as noted above.
MICROSOFT WORD
Although other options are becoming more popular, many of our clients rely on Word for writing and editing text. While there are some important limitations, we can usually get good results from your Word files.
The best workflow is to make a PDF right from your native file on the computer you are using to create the piece in Word. Word files often have text reflow and other formatting issues when moving them from one computer to another. This is caused mostly by inconsistencies in fonts and page specs. Producing a PDF is the best way to avoid that frustrating situation and have a portable, properly-formatted file that will give you the results you are expecting. Once you know how to make good PDF’s you’ll never have to worry about it again.
File submission guidelines
FILE FORMATS
Print-ready PDF’s are the best!
We can work with just about anything you throw at us, but print ready PDF’s are the most efficient and cost-effective way to get the best results. If you need guidance just give us a call, we’re here to help.
The hourly rate to prep or rework files that need it is $75.
IMAGE RESOLUTION
All images should be 300dpi at their final print size. Images may look good on your screen at 72dpi, but higher resolution is required for quality printing. Lo-res images just don’t work.
We work with all image formats, including TIFF, EPS, JPG and PSD.
LAYOUT INFO
For best results, please consider using Adobe InDesign to create Acrobat (PDF) files for printing. These are the best tools for the job, but we’ll work with whatever files you have.
Bleed and Trim - Know about this, it matters. You don’t have time to have to do it over.
Safety Margins – Keep the content at least 1/8” inside the trim area.
HOW TO SUBMIT YOUR FILES
EMAIL- Send files to printit@copymatwestwood.com
UPLOAD – Submit your files through our easy upload tool here. Make it even easier and zip multiple files first.
STOP BY- Come on in, bring your USB flash drive, external hard drive, CD or DVD.
We’re always happy to answer any questions about file preparation or anything else, just give us a call.
Don’t forget – Good PRINT-READY files save time!!
MAKE A .ZIP FILE FOR EASY UPLOADS
Create a .zip file to make uploads quick and easy.
First, gather the files you want to send into a new folder.
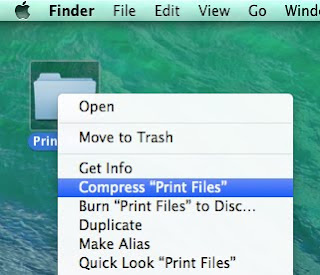
If you’re on a Mac, control + click to open the contextual menu, and choose “Compress”. You will see the .zip file appear next to the original folder.

In Windows, right-click on your folder, and choose “Send to > Archive”.
Then use our uploader to send your files and get your project underway!
First, gather the files you want to send into a new folder.
If you’re on a Mac, control + click to open the contextual menu, and choose “Compress”. You will see the .zip file appear next to the original folder.

In Windows, right-click on your folder, and choose “Send to > Archive”.
Then use our uploader to send your files and get your project underway!
Subscribe to:
Comments (Atom)
